Glam
My server 'glam' is one of my computers in my lab.
This Raspberry Pi is a Raspberry Pi 4 Model B Rev 1.5, it used to be 'glimmer'. I use this system as my network router.
See MicroSD for notes about disk images.
This system is running Raspberry Pi OS (64-bit) which doesn't use grub as the bootloader.
History
For the longest time I used Smoothwall (smoothwall.org) as the router on my network. In the olden days I ran it on a bare metal system, and more recently in a VirtualBox VM.
In early 2023 I switched from using Smoothwall to using OPNSense (opnsense.org) also in a VirtualBox VM running on 'tradition'. The reason for the switch was that Smoothwall seems to be mostly unmaintained these days and friends recommended OPNSense as being a better choice.
I am now remaking my network router on this Raspberry Pi because the OPNSense router running in the VM on 'tradition' is the only thing that requires me to keep 'tradition' (which is a full ATX tower) powered on all the time. So I am hoping that when my network router is on a Raspberry Pi I will be able to keep 'tradition' switched off when it's not otherwise in use and thereby save some power (and lessen my carbon emissions and my electricity bill).
Defence in depth
Smoothwall had a system where you could have multiple "DMZ" type isolated subnets layered on each other, a form of defence in depth. There were various options for this but the one I mostly used was the three-tier one which gave me GREEN (for my LAN), ORANGE (for my DMZ), and RED (for my guest/wifi network). I carried this system forward when I designed my other firewall/routers including my OPNSense router and this Raspberry Pi router that I am building presently.
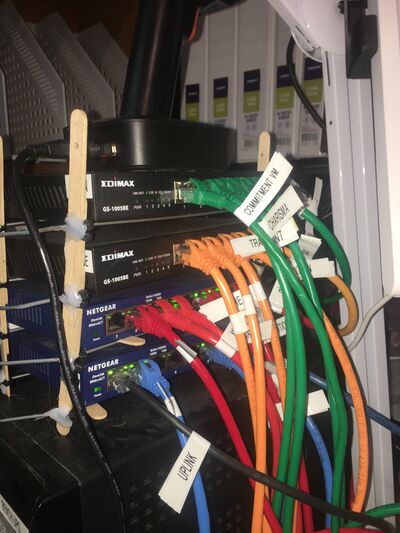
To be clear about this the various subnets are physically isolated (see the photos of the switches below) and the access works like this:
| You're on | So you can access |
|---|---|
| GREEN | GREEN, ORANGE, RED, BLUE, Internet |
| ORANGE | ORANGE, RED, BLUE, Internet |
| RED | RED, BLUE, Internet |
| BLUE | BLUE, Internet |
The various subnets have different purposes:
| Subnet | Purpose |
|---|---|
| GREEN | secure network (bastion, backups, certificate authority, etc) |
| ORANGE | LAN, for day-to-day work |
| RED | lab LAN, for untrusted devices/software |
| BLUE | guest network, wifi |
Installation
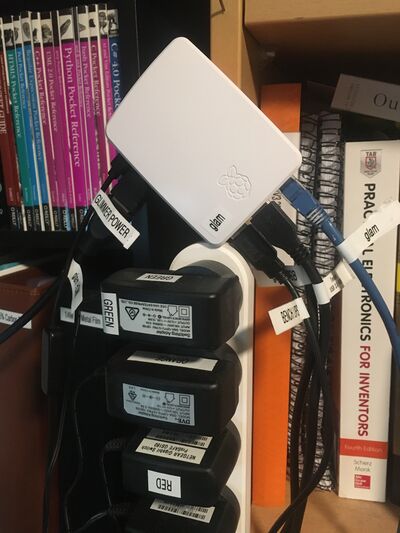
At the moment this RPi is just floating above a powerboard attached to my bookcase. It is held in place by my two favourite adhesives: blu tack and gravity. It's up there so it gets better airflow for cooling than if it were sitting on the UPS below it (as it used to) and also because the weird angles of the cables being at 90° to each other lead the previous micro HDMI adapter to snap in half, so hopefully we avoid that this time around by putting less stress on the cabling. I would like to install this better but this will do for now.
In the following photo you can see the BLUE network cable attached directly to the RPi's onboard NIC, that's the 'end0' network interface which is named differently to the others because it's not a USB device as the others are, see below.
USB NIC cabling
The following photo shows the RED (enx00e099001bf7), ORANGE (enx00e099001bf6), and GREEN (enx00e099001cc7) USB NICs which are attached to 'glam' via a USB 3.0 Hub, Tendak USB Hub with 4 USB 3.0 Data Ports + 1 USB Smart Charging Port and Power Supply Adapter with Individual On/Off Port Switches for PS4 Pro PS4 Slim Xbox One.
Network switches
The following photo shows the four Ethernet switches which comprise the backbone of the wired networking in my lab. I also have an extra two RED switches on the other side of the room.
Configuration
Predictable network interface names
To enable predictable network interface names (based on MAC address):
# sudo raspi-config
Then: Advanced Options -> Network Interface Names -> Enable predictable network interface names (yes)
and reboot.
IPv4 configuration
$ cat /etc/network/interfaces
# interfaces(5) file used by ifup(8) and ifdown(8)
# Include files from /etc/network/interfaces.d:
source /etc/network/interfaces.d/*

# 2023-11-06 jj5 - BLUE:
#
auto end0
iface end0 inet static
  address 10.0.0.5
  netmask 255.255.0.0
  gateway 10.0.0.1
  dns-nameservers 10.0.0.1

# 2023-11-06 jj5 - RED:
#
auto enx00e099001bf7
iface enx00e099001bf7 inet static
  address 10.1.0.5
  netmask 255.255.0.0

# 2023-11-06 jj5 - ORANGE:
#
auto enx00e099001bf6
iface enx00e099001bf6 inet static
  address 10.2.0.5
  netmask 255.255.0.0

# 2023-11-06 jj5 - GREEN:
#
auto enx00e099001cc7
iface enx00e099001cc7 inet static
  address 10.3.0.5
  netmask 255.255.0.0
$ tail -n 8 /etc/sysctl.conf
# 2023-11-06 jj5 - Disable IPv6
net.ipv6.conf.all.disable_ipv6 = 1
net.ipv6.conf.default.disable_ipv6 = 1

# 2023-11-06 jj5 - enable routing:
net.ipv4.ip_forward=1
$ cat /etc/iptables/rules.v4
# 2023-11-06 jj5 - SEE: https://gridscale.io/en/community/tutorials/debian-router-gateway/

*nat
-A POSTROUTING -o end0 -j MASQUERADE
COMMIT

*filter
-A INPUT -i lo -j ACCEPT
# allow ssh, so that we do not lock ourselves
-A INPUT -i enx00e099001cc7 -p tcp -m tcp --dport 22 -j ACCEPT
# allow incoming traffic to the outgoing connections,
# et al for clients from the private network
-A INPUT -m state --state RELATED,ESTABLISHED -j ACCEPT
# 2023-11-06 jj5 - interfaces:
## BLUE....: end0
## RED.....: enx00e099001bf7
## ORANGE..: enx00e099001bf6
## GREEN...: enx00e099001cc7
# 2023-11-06 jj5 - disable between interfaces... this isn't working as I expected so commented out for now...
#-A FORWARD -i end0 -o enx00e099001bf7 -j DROP
#-A FORWARD -i end0 -o enx00e099001bf6 -j DROP
#-A FORWARD -i end0 -o enx00e099001cc7 -j DROP
#-A FORWARD -i enx00e099001bf7 -o enx00e099001bf6 -j DROP
#-A FORWARD -i enx00e099001bf7 -o enx00e099001cc7 -j DROP
#-A FORWARD -i enx00e099001bf6 -o enx00e099001cc7 -j DROP
# prohibit everything else incoming
-A INPUT -i end0 -j DROP
COMMIT
# apt install iptables
# cat /etc/iptables-rules.sh
#!/bin/bash
iptables-restore < /etc/iptables/rules.v4
# chmod +x /etc/iptables-rules.sh
# cat /etc/systemd/system/iptables-rules.service
[Unit]
Description=Apply custom iptables rules

[Service]
Type=oneshot
ExecStart=/etc/iptables-rules.sh

[Install]
WantedBy=multi-user.target
# systemctl enable iptables-rules.service


